Saturday, 22 January 2011

Mini cakes

I was lucky enought to get a mini cake tin for Christmas, and some bun cakes to use in them.


The pink ones are lovely and bright and I adore the sweet flowery ones. You can see them here beside a normal case.


I decided to keep my first attempt simple, using normal bun mixture. I made enough batter to do a dozen 'normal' sized buns, and ended up with 30 mini ones! So next time I'll cut the recipe down. Also I might overfill them slightly to make just 12 so I don't have to wait for one set to finish to make the last 3.

1 egg
2 oz caster sugar
2 oz self raising flour
2 oz margarine

1) Cream sugar and margarine until well mixed and lighter in colour
2) Beat in the egg
3) Mix in the flour
4) Spoon in to bun cases
5) Bake for 15 min at 180 C

I kept the decorations colourful with some chocolate and Smarties.

I also made some almond petit fours. As usual you had to lick them off the bun cases as they stick to the paper but I quite like them that way now.

The end result looked like a kids party :)

I'm trying to think of other things to do with my cake tin now. Mini cheesecakes maybe. Any suggestions?

Saturday, 8 January 2011

Christmas Cake

I made the actual cake back in October (which was probably a bit late) using Mary Berry's standard Christmas cake recipe, feeding it with Cointreau a few times. Unfortunately I only got a chance to decorate it on Christmas Eve so didn't have much time.


I've always loved a design in one of my cake decorating books "The Home guide to Cake Decorating". It's a fantastic book and there's a template for the Three Kings with as a piped run-out with royal icing, it also has fancy collars round the edges.

Being pushed for time I decided to paint onto the cake. I've wanted to try this for a while after seeing beautiful cakes like this from Birthday Cake Party:
I used an edible marker pen to draw on the outline using the tempate in the book as a guide. I had wanted to get black paste for the outlines, but as luck would have it , it was the only colour sold out in the shop. I'd definately use it next time to get a stronger outline.

I then used food colours to paint. These worked out okay, but the colour was a bit thin and it was a bit watery for fine work. Lustre dust mixed with alcohol made for a much more effective result. Here the blue is food colouring and the purple and gold are lustre dusts. I kept the colours to a minimum as I liked the effect. The gold came out really sparkly, I can wait to use it again. I might get some silver too!
And the finished product. I did go over the lines a bit, but I was trying not to put any more fingerprints in the icing from leaning my hand on it. I think if I had more time I'd do a better job but I'd like to give painting another go. We still have some cake left but as it keeps practically forever I'm enjoying it!

Christmas Cupcakes

I am at last getting round to posting the rest of my Christmas baking, the trouble being that being so busy before these are now out of date. Maybe for next year though :)

Okay so I said I wasn't going to buy any more cutters after getting over 100 last Christmas but I couldn't resist a little holly plunger cutter. I made some chocolate buns and made them look like Christmas puddings. I think they're cute and chcoclate always goes down well. Maybe a little baking powder would have given them a more puddingy top, I'll have to try again for practice!
I even got some cupcake wrappers, they did unfortunately leave red on the cake pan and people's hands a bit, so I had to warn them. Worth it I think though.

Sunday, 12 December 2010

Gruyere Cheese Stars

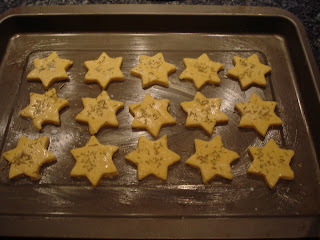
I was having a look through the Marks and Spencer's catalogue and found a recipe for these biscuits. They looked so yummy I had to try them! They were sooooo tasty I'm going to make more (Don't worry I didn't eat them all!). The only changes I made was putting them on a greased tray, not baking paper but them came of fine, also I used rosemary on the top.


The recipe is in the free Christmas magazine, but for those who can't get hold of it here it is:

Makes approx 26

125g Plain Flour
100g unsalted butter, diced
1/4 tsp mild chilli powder
100g Gruyere cheese, finely grated
1 tbsp milk
caraway seeds or rosemary
to decorate

1. Put the flour, butter and chilli powder in a food processor and pulse until the mixture resembles breadcrumbs. Add the cheese and pulse again to bring the dough together. Shape into a flat disc, wrap in cling film and chill in the fridge for 1 hour until firm.


2. Heat the oven to 180 C/350 F/gas 4. Line 2 baking sheets with baking parchment. On a lightly floured surface, roll out the dough to 5mm thickness. Use a 5-6cm star-shaped cutter to stamp out the biscuits, then re-roll the trimmings to stamp out more.


3. Put the stars on the baking sheets, brush the milk and sprinkle with caraway seeds or rosemary. Bake for 12-15 minutes until golden. Leave to cool.
N.B. Per biscuit: 57 calories, 4.2g fat, 0.2g salt.


Friday, 3 December 2010

Practice Pies

As it's December I thought I'd do a little Christmas Baking. My Christmas cake is baked and being fed regularly with Cointreau. I did skip on making a proper pudding though, as I just couldn't handle watching it steam for 7.5 hours, especially as I've never steamed anything before. As I'm a firm believer in not waiting until one day of the year to eat your favourite things, I made some mince pies.

Strangely I've never made mince pies before, so these are my practice pies. The pastry recipe I used was a bit short, so I think I'll just have to give them another go (yay more mince pies!)


I like Christmas Trees as a wee change from the usual stars too. I also bulked up the sweet mincemeat with some stewed apples. It makes a moister filling and goes further. Off to sample them now, yum...

Saturday, 16 October 2010

The Great British Bake Off

A bit behind the times I know, but I'm enjoying the Great British Bake Off on BBC's I Player. There were so many yummy recipes it's made me want to run to the kitchen and try out something new.

Mary Berry's Ultimate Cake book is my 'go to' book for recipes, so seeing her on the show was good. She's just how I imagined from her picture on the book, kind but takes no nonsense!

My only quibble was that for a show about baking they didn't show you much about how to bake a cake, though I suppose they don't teach you how to sing.

Wednesday, 4 August 2010

Wedding Cake

I did my first wedding cake this year: my own! I couldn't resist the challenge and am so glad I did it.


It all started a few months before the big day. The bottom tier was fruit cake and was done under supervision by a professional baker, my grandad :) He advised (and it definately was needed) a new clean bucket as I didn't have any bowls big enough to take the volume of a 12" cake, my biggest yet.


Here's it all mixed in using a cake tin that's seen more wedding cakes in it's life than Elizabeth Taylour.


It was so heavy going in the oven! A few nervous hours later it came out smelling lovely and was cooled then wrapped up to mature.

The other tiers were a 10" chocolate madeira and a 8" lemon madeira. I made them a few weeks before and froze them undecorated. They came out fine and were filled with (a whole jar of) choclate spread and lemon buttercream respectively. In fact they defrosted in a few hours which was lucky as I had actually forgotten to take them out of the freezer the night before!

Actually stacking the cake was pretty scary but was fun. I used wooden dowells and pushed them into the fruit cake, then removed aand cut to the hightest length.The middle tier was stacked on top. My 2 tier birthday cake was a good practice for using dowells, especially as I found that plastic ones are tricky to cut as they 'squished' instead of leaving a nice flat edge. The top tier went on with pillars which were a bit harder than they looked! One of them sank into the middle tier a bit as the dowell was slightly too short but it wasn't noticable unless you looked carefully. I don't have any pictures as I didn't have enough hands.

The design was from my previous lace cake, as it was simple, easy and relatively quick. I don't think I could have handled the stress of fancy piping. I used thicker fondant than last time to remove the lumps and bumps and create a smoother effect, though I have since invested in an icing smoother that might have come in useful. The lace was also great for hiding a not so perfect edges. I also covered the top and bottom cake boards with fondant to finish the look. In the end I chose ivory as it was such a rich colour and matched my dress, plus the pillars came to match the icing.

My toppers were nearly more elaborate flowers. I'd looked in the shops for a bride and groom topper but they were all ugly in my opinion. I spotted these the week before and ordered thinking if they came on time all well and good if not I'd do more flowers. Luckily they arrived in a few days to finish it off and they're now safe on my mantlepiece.


Here's a picture of the final result. There are a few things I'd do differently if I was making another one but I love it and am so pleased with how it looked. Unfortunatley I can't tell you how it tasted, I was too full after dinner and it got eaten over the rest of the night!